
Catalogue, Sound Effects, JSON for Instructions

This week I updated the image for the catalogue and added it to the Living Room environment as an image plane (~2hrs). I am currently adding smaller clickable planes on top of it to represent the different furniture options to choose to build. A screenshot of this can be seen below.


I also looked for some sound effects to use for user feedback (~2hrs) when pieces are combined together correctly, incorrectly, pieces are dropped, etc. These sound files have been added to the shared drive and will be implemented in the code in the next few days.

Some example sounds can be listened to at the following links:
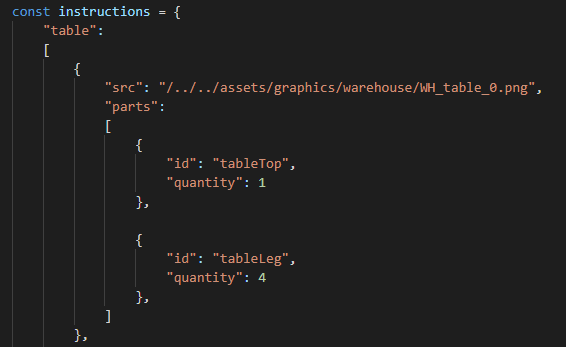
I also worked on adding JSON for the builder.js and finder.js files to store the required information for the instructions (~1hr). An example of how I set up the data is shown in the screenshots below. However, a function still needs to be written for the actual progression of the instruction steps.

The instructions JSON for the Warehouse environment requires extra information about the quantities of pieces.


The instructions JSON for the Living Room environment requires extra information about the number of snaps that will be expected given the pieces added to the scene.


Other items I will be working on in the next few days include adding solid walls to the Warehouse environment, creating a function for firing furniture IDs on click for the catalogue (to start the instructions steps), and playing sound effects on events. 

Comments

Popular posts from this blog

[FINAL] - Where to find our game

Hello future builders, we're 3 programmer-artists that make up the Seismic Octopus team: Mitchell Koch - lead programmer, game tester, researcher  Priscilla Lo - project manager, sound design, lead 2D artist, programmer, documentation  Maxime Vincent - lead 3D artist, lighting designer, game tester We finished this course in May 2020 with a final release of Build-a-Furniture available on GitHub: https://github.com/Areizza/Build-a-Furniture Although this semester was full of hardships and unprecedented times near the end, we got through it together and are proud to present our simple web-VR game. Check it out and let us know what you think! :)

Sprint 10 - Adding more boxes and lots of scripting

As the final submission draws near, lots of work has yet to be done. Due to time constraints and the lack of resources in light of recent events, we made the decision to cut down our scope by removing VR functionality entirely and focus on desktop-to-desktop connection fully. With new goals in mind, I spent the beginning of the week by adding all the boxes for spawning furniture components. To do so, I started by replacing the blue boxes we used previously with stylised boxes that match the environment better. To tell the player what each box contains, an image of the rendered component is placed on each side. The challenge here was that I wanted to avoid creating a GLTF for every single box because it would have slowed down the page drastically. The solution was to instead use a single, universal GLTF for every box and placed images on each side of the box as explained previously (~6hrs). New Warehouse Area - Added new boxes Close up of updated box - Bright colours and side ...

Making Instructions

This week, I worked on creating all the instructions images for both the Warehouse and the Living Room. Although this was not a very difficult task, it was tedious to work on and took around 3hrs to complete. It was a challenge to adjust to our new schedules given the current circumstances and allot appropriate time to spend on each of our classes. The instructions in the Living Room show the current required furniture pieces and their quantities, which the Builder will need to communicate to the Finder in the Warehouse. See below for an example of pieces required for a table. On the other hand, the instructions in the Warehouse would show the symbols on the different furniture pieces that should touch in order to be combined, which the Finder will need to communicate to the Builder in the Living Room. See below for an example where the green heart marking should be made to touch the green circle marking. I will be putting the source link for these instructions into arr...